Monday, March 24, 2014

BBQ Chicken Pizza


 I really love the BBQ Chicken Flatbread at TGI Friday's, so I thought that maybe I could create my own at home. I used some of my favorite ingredients: fresh mozz, red onions, and honey BBQ sauce, to make a really amazing homemade version of the favorite.

I found this at Wal Mart and it's really amazing. It's smoke-free, corn syrup free, and has yummy honey in it. Make sure you get this.


Also, please make your own pizza dough! It's really simple and it makes all the difference in the health level and quality of your pizza.

 Pizza Dough (for 1 large pizza):
  • 1 Tbs. active dry yeast
  • 1 tsp. sugar
  • 1 cup hot water (110-115F)
  • 3 cups all-purpose flour
  • 1 tsp. salt
  • 2 Tbs. extra-virgin olive oil
This is a really quick food processor dough. You can do this.

First, Combine the yeast and sugar in a bowl. Get the tap water hot. If it feels too hot for your hand, it's the right temperature for the yeast. Pour 1 cup of hot water in with the yeast, and let it sit for about 5 minutes. Until frothy on top. If it doesn't get all frothy on top, your yeast is bad and you need new yeast.

In the bowl of the food processor, combine the flour and salt, and pulse a few times. Next, with the mixer running, slowly add in all of the yeast mixture, being sure to scrape out all of it. Let the mixer run until the dough clumps into a nice ball.

Coat a large bowl with the olive oil, and form the dough into a round shape. Toss it around in the bowl so it gets coated in the oil. Cover the bowl with a towel and let it rise in a warm place, such as in a warm oven with the door cracked open, or in a warmer drawer, until doubled in size--about 1.5 hours.

Pizza Ingredients:
  •  1 cup of honey BBQ sauce (smoke free!)
  • 8 oz. fresh mozzarella
  • 1/2 cup chopped roma tomato
  • 1/4 cup thinly sliced red onion
  • 8 oz. of mixed cheese (whatever you want--cheddar, parmesan, monterey jack...)
  • 1 tsp. dried oregano, or 2 tsp. fresh, chopped
  • 1 chicken breast, cooked and shredded
While your pizza dough is hanging out in the sauna, cook your chicken in a pan on the stove. Like I am always saying, guys, get the pan hot before adding in your fat, and then when the air above it feels hot, add in your SALTED chicken. Sear on the first side for 3-7 minutes, depending on the thickness, and then flip it once and cook the other side. Set aside for 5 minutes to cool before shredding. You could also bake it at 375 for about 25 minutes.

 Prepare your toppings--chop up the veg, slice your fresh mozzarella, and then preheat your oven to 400F with your pizza pan/stone inside. If you don't have either of those, just use an upside down cookie sheet, just make your pizza a rectangle shape so it fits. 

When the dough is ready--after the 1.5 hour period, flour up your hands and your surface, and punch it down. Scrape out all of the dough onto a flat surface, and roll it into a thick, 8 inch circle. From there you can toss it, stretch it out in the air, dance around the kitchen to 80's rock music,  and whatever other crazy stuff you want to do to make it the shape you need for your pizza. It should be pretty thin in its final form--about 1/4 inch thick. As you are stretching it out, though, if you want a thick crust, try to leave the outer 1 inch of the circumference a little thicker than the center.

When it's all stretched out and good to go, flour it again and lay it on your counter for a sec.


Take your hot pizza cooking surface (whatever it may be) out of the oven and pour and spread out some olive oil evenly over it. Lay down your pizza crust. There will be sizzling- and this is good.

Next, brush the surface of the crust, minus 1 inch of circumference, liberally with BBQ sauce. Toss your shredded chicken in the remainder. Add on your tomatoes, sauced chicken, and then the shredded mixed cheese. Add on your fresh mozzarella, scattered about, and then your onions and oregano. Add a crack of black pepper and a scattering of sea salt. Add a brushing of olive oil the the crust.


 Place in the oven for 18-25 minutes, until browned and bubbling.


Saturday, March 22, 2014

Baked Empanadas

 So we already have gathered that I love dumplings...Well, these are at least second-place in my rankings. This crispy, buttery crust encapsules the spicy, tangy, meaty goodness that reminds me of some tropical vacation. Dipped in a gooey cheese sauce, these empanadas make my day.


 Dough Ingredients:

-3 cups all-purpose flour
-¼ teaspoon salt
-6 oz unsalted butter (1 ½ sticks), chilled and cut into 12 pieces
-1 egg
-4-5 tbs water

 Combine flour and salt in your food processor. Add in butter and egg. Pulse until fully combined. Sprinkle in water with the machine on until the dough clumps up. You may not need all of the water. (You can also do this by hand if you don't have a food processor (or if you haven't made it to the gym this week).

Dump out the dough onto the counter and form a ball. Flatten it slightly, wrap it in plastic, and place it in the fridge for about 1 hour.

Empanada Filling:

-2 cloves of garlic, minced
-1/2 cup shredded carrot, minced
-1/2 cup yellow onion, minced
-1 tsp. cumin
-1 tsp. smoked paprika
-1/2 tsp. cayenne pepper
-1/4 tsp. mustard powder
-1 tsp. salt
-1/4 tsp. ground pepper
-1/2lb of ground pork
-1/2 lb. of ground beef


Heat a large pan on medium-high. Pour in a glug of olive oil and wait until you feel the heat radiating when you wave your hand in the air over the pan. Add in your onions and garlic. Let them sizzle and get nice and golden brown--about 5 minutes. Next, add in your carrot. Toss this all around and then add in all of your spices and salt and pepper. Let this mixture get nice and fragrant. Last, add in the ground meat and combine fully. Cook down 5-10 minutes until fully browned. Taste, and add more cayenne to taste or more salt if needed.

 Set aside to cool.


In the meantime, take your dough out of the refrigerator and roll out until thin, using a little flour to keep it from sticking. Using a small bowl, large cookie-cutter or even just a knife (if you are good at things like that) cut out 6 inch rounds. Lay them onto a tray covered with tin foil. Start adding about 1 tablespoon of the filling onto each round and fold over, pressing the edges together with a fork. Make sure no filling is escaping, because they will pop open in the oven!


When you have finished filling them, brush all of the tops with egg wash and place back in the fridge for 30 minutes. This will help them stay sealed in the oven.


Preheat the oven to 400F. Bake empanadas for 18-25 minutes, until bubbly and golden brown.


Serve with white queso from the Mexican section--or sour cream! Yum....

Friday, March 14, 2014

Asian Potstickers


So I have already made some Asian Egg Rolls, so next, of course I should show you how to make dumplings! These are my absolute favorite food in the universe. Anyone who knows me knows that I LOVE pasta in any form--particularly dumplings. My secret pleasure is buying dumplings from the local Chinese restaurant.

These "potstickers" (I call them that because I use wonton wrappers to make them instead of homemade dumpling dough) are really easy to make. The sauce is my secret recipe--as close as you can get to the amazing Chinese restaurant stuff. Trust me, you won't find this anywhere else.


Dumpling Sauce Ingredients:
- 1 Tbsp. chopped spring onion
-1 tsp. chopped garlic
-1 tsp. chopped ginger
-1/8 tsp. chili powder
-1/4 cup black vinegar (sugar cane vinegar--you can find this at an Asian market)
-2 Tbsp. soy sauce
-2 tsp. sesame oil
- 1 tsp. honey
-1 tsp. water

Combine everything, taste. Add more honey or water to taste. Serve at room temperature.


Ingredients for Potstickers:
-1lb. ground pork
-1/2lb. ground beef
-2 cloves of garlic
-1 inch of peeled ginger, sliced
- 1/2 cup of shredded carrot
- 6 spring onions, sliced
- 1 tsp. salt
-1 package of wonton wrappers (48)
To make the Potstickers:

1. Place all of the dumpling filling ingredients into your food processor.

 2. Blend until everything is all chopped up evenly and you can smell the garlic and ginger.


 3. Prepare a surface for your work, a small bowl of water, and a plate with a damp cloth, ready to cover the potstickers. Lay out your first wonton wrapper and place 1 teaspoon of filling in the center. Dip your finger in the water and run it around all of the edges.


4. The next step is the folding. Honestly, you can just fold it in half--or whatever shape you want. For this fun shape, start by pressing two corners together in the center.


5. Next, fold in the other two corners, pinching the center together.


 6. Make sure it is entirely sealed, or it will fall apart when it cooks.


 7. Continue this process until you are out of meat and wonton wrappers.


8. To cook, preheat a wide pan to medium heat. Once hot heat radiates from it, add in 2 tsp. butter and 2 of oil. Let it coat the pan. Add in one layer of potstickers, being sure not to crowd the pan. 


 9. Let them sizzle away like this for 3-5 minutes, undisturbed. Pick one up to see if the bottom is brown enough.


 10. Next, you can either continue flipping them around and browning them--they will be nice and crispy this way--or you can add 2 tablespoons of water, and cover them quickly with a lid, and simmer them for 5-8 minutes until they are softened and steamed (these ones are pan fried).


 Ta-da! Beautiful.

Now, all you need it your sauce and some fixin's. 


Sunday, March 2, 2014

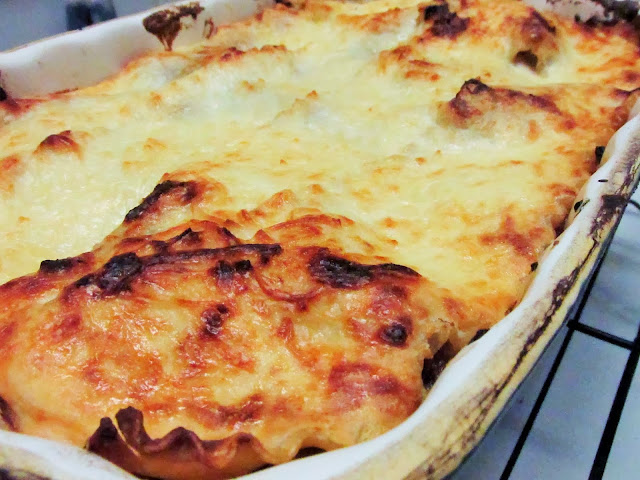
Butternut Squash and Sage Lasagna (Vegetarian)

My husband and I both enjoy meat, and all things hearty, however neither of us are great fans of lasagna. I decided to try this recipe by Martha Stewart, to see if it was possible to change my mind about this unusual, layered thing.


Like butternut squash ravioli, this is rich and satisfying--a real treat! Even if I don't prefer regular lasagna, I can be a proud promoter of this spin-off.


Ingredients:
- 3 1/2 pound butternut squash, peeled, seeded, and cut into 1-inch pieces 
-2 tablespoons extra-virgin olive oil 
-Coarse salt and freshly ground pepper 
-1 pound whole-milk ricotta cheese 
-1/2 cup heavy cream 
-2 large egg yolks 
-1/2 pound fresh mozzarella cheese, coarsely grated (1.5 cups-ish) 
-Freshly grated nutmeg 
-2 tablespoons unsalted butter 
-1/3 cup loosely packed fresh sage leaves, coarsely chopped 
-1/2 cup low-sodium chicken or vegetable stock 
- 1 pound of lasagna noodles, cooked
-4 ounces finely grated Parmesan cheese (1 1/4 cups)


Preheat oven to 425F. First, cut and peel the squash. The easiest way is to cut off the straight part from the round part, peel each section individually, and then half the round section, scrape out the goop, and dice everything all up. 


The orange squash is from my garden this summer! Look at the difference in color between it and a store-bought one. Mine also has a very delightful fragrance. The contrast was so distinct in every way.


Scatter the squash onto a foil-covered baking sheet, drizzle with olive oil, 1 tsp. salt, 1 tsp. pepper, and mix it all around with your hands so it's fully coated. Bake until golden brown and soft--20-25 minutes.

In the meantime, cook your pasta minus 2 minutes of the cooking time (so that it doesn't get mushy in the oven). Toss in cold water, and set aside. 

In a medium bowl, combine ricotta, cream, egg yolks, mozzarella, and a dash of nutmeg. Set aside. 


Melt butter in a saute pan over medium heat, and chop sage, and toss into the butter. Let cook until fragrant and slightly browned. 


When the squash is done, scrape into a bowl with the stock and the sage and butter mixture. Mash it halfway with the back of a spoon, leaving some chunks. Just make sure that it's not watery, but creamy. 


Set the oven to 375F. Butter a 9x13 baking dish. Spread 3/4 cup of ricotta mixture into the bottom. 


Lay one layer of noodles (4 slightly overlapping) over this. Spread half the squash mixture. Add another layer of noodles.


 Repeat with half the remaining ricotta, then noodles, the last of the squash, the last of the noodles, then ricotta. Sprinkle the top with the Parmesan. 


Bake about 30 minutes until browned. Cool for about 10 minutes to allow the juices to settle. Serve!